Blog
When to Hire a Handyman for Flooring Installation: Expertise for a Flawless Finish
Flooring installation is a major home improvement that can alter the appearance as well as feel of the room. If you're replacing floors that are worn out or converting to a brand new style, the right installation is vital to ensure an impeccable and long-lasting appearance. Although some homeowners might think of the installation of flooring as a DIY job however, there are times where it's better to employ an experienced handyman. Handymen bring expertise as well as experience and a high degree of precision to the job, making sure that your flooring is put in place correctly and with perfection. In this article, we'll examine the best time to think about hiring handymen to help you with your flooring installation.
1. Complexity of the Project
The flooring installation process can be easy to complicated, based on the flooring material used and the complexity of the design. If you're installing a basic laminate flooring, which is click-together, in a compact and simple space, it could be an easy DIY project. But if you're working with more complex flooring like tiles, hardwood or carpet, and if your design includes numerous rooms, angles or designs, it's best to employ an expert. Handymen have the experience and experience to manage complex installations, and ensures exact cuts, a proper flooring preparation and smooth transitions between various areas.
2. Specialty Flooring Types
Certain flooring types require specific skills and methods to install. For instance, if installing natural stones or intricate mosaic designs or premium vinyl planks with intricate designs, it is best to use a professional who is experienced in handling these kinds of materials. They will ensure that the installation requirements for these flooring styles are met, for example, the proper application of adhesive, underlayment and grouting methods. If you hire a handyman you can rest assured that your flooring of choice will be properly installed that it will stand out, highlighting its unique design and extending its lifespan.
3. Tools and Equipment
Flooring installation typically requires special tools and equipment that might not be available to the average home owner. From nail guns and power saws to carpet stretchers and tile cutters having the proper tools is crucial to ensure the installation to go smoothly. Making the investment or renting these tools is costly and time-consuming. Handymen are equipped with a range of equipment and tools needed for various flooring installation. They have the experience to use these tools safely and effectively, making sure they perform an efficient and precise job. When you employ a handyman you will not have to deal with the cost and hassle of purchasing specialized tools for a single project.
4. Time and Efficiency
The installation of flooring is an time-consuming procedure, particularly when you're working on it as an DIY project with no previous knowledge. A handyman on the other hand, is able to complete the task efficiently due to their expertise and experience. They can evaluate the scope of the project, design an outline of the timeline, and then allocate the resources needed to finish the installation within the specified timeframe. If you hire a handyman you will save time and get the flooring you want installed quickly and without causing interruptions to your routine.
5. Proper Subfloor Preparation
The condition of your subfloor is vital to the long-term durability and stability of your flooring. When the floor is sloppy, damaged or not properly prepared it could cause issues like creaking, buckling or wear and tear that is premature. A handyman knows the importance of preparing your subfloor properly and can resolve any issues prior to installation. He can even out uneven floors or repair damaged areas and create a smooth and solid base for your flooring. If you hire a handyman you'll have peace of peace of mind knowing that the flooring will be put on a sturdy subfloor making it less likely to experience problems in the future.
6. Warranty and Guarantee
Many trustworthy handymen provide warranties or guarantees for their work. This adds a security and guarantee that flooring will be carried out right. If any issues arise following the installation the handyman can solve them quickly and efficiently to ensure your satisfaction. When you hire a handyman you will be able to trust the high-quality of their work and the long-term durability of the flooring you have installed.
In the end, knowing the right time to engage a handyman to install flooring is vital to get the perfect and professional result. The amount of work and the type of flooring you prefer tools and equipment, the time and efficiency, the proper subfloor preparation, as well as a the warranty and guarantee are all aspects that will guide your choice. If you hire an expert handyman, you will get your flooring installed with precision and expertise adding beauty and worth of your home.
Advantages of Having a Well-Maintained Home for Resale Value
When it comes time to sell your house first impressions are crucial. Prospective buyers tend to be drawn to a home that has been well-maintained and has a charming appearance and is ready to move in. While it will take some effort and time to keep your house in top condition will significantly affect the value of your home when it comes to resales. In this post, we'll discuss the benefits of an aesthetically maintained home and how it could contribute to a greater resale value.
1. Increased Buyer Appeal
A home that is well-maintained offers a distinct advantage in attracting prospective buyers. If potential buyers visit a property that is tidy, well-cared for and in good shape and immediately imagine their lives there. They can envision their furniture, belongings and even their future within the home. The emotional connection could make a an enormous impact on their decision-making.
The majority of buyers prefer homes that do not require immediate repair or renovation. They prefer to avoid the expense and hassle of fixing structural issues or replacing old fixtures or dealing with neglected maintenance. When you show a clean and well-maintained house it is more likely to attract attention from buyers and also receive higher-quality offers.
2. Higher Perceived Value
Aesthetics play an integral aspect in the perception of value of a property. A home that is maintained well is usually viewed as having more value as compared to a neglected and worn-out house. People are prepared to shell out more for a house that is well-maintained, because they are able to imagine themselves living in peace without the need for urgent repairs or renovations.
Regular maintenance and upkeep help keep the general condition of your house. This includes keeping a neat and well-maintained lawn, making sure that the exterior is properly painted and maintaining the interior neat and clean. These elements make a positive first impression and boost the value of your home.
3. Competitive Advantage in the Market
In a highly competitive market for real estate maintaining your home in a good condition will give you an important advantage. It differentiates your property from other properties, particularly those with similar prices. Buyers usually have a wide selection of options to pick from and a well-maintained house could be a distinguishing feature that makes your home make an impression.
When you have a home that is well-maintained is a chance to highlight the strengths of your home and highlight the potential of your home. Buyers are more likely feel comfortable buying when they know that the home has been taken care of. This can result in faster sales and possibly multiple offers, which allows buyers to negotiate a better selling price.
4. Avoidance of Negotiation Pitfalls
If a house requires major renovations or upgrades buyers will often bargain for the purchase price to be lower. They consider the expense of renovations and repairs, as well as their time, effort and cost needed to finish these projects. If you take proactive measures to keep your home in good condition will reduce the likelihood of these disputes and protect its value. home.
Regular maintenance helps to detect and fix problems before they turn into major issues. This will help you avoid costly surprises when you go through the process of home inspection. If you are on top of routine maintenance and responsibilities, you can show prospective buyers that your property is well-maintained and reduce the chance of them seeking price reductions due to perceived issues.
5. Peace of Mind for Buyers
A clean and well-maintained house gives peace of mind for potential buyers. It provides them with confidence that the house is well taken good care of and is less likely to be a victim of problems that are not apparent. This can lead to more smooth transactions and greater level of trust between the seller and buyer.
A maintained home with less risk and a less likelihood of having unexpected costs following the purchase. This can result in an overall positive experience, greater satisfaction and perhaps even referrals to relatives and friends who might be looking to buy the purchase of a new house.
Maintaining your home in top condition will provide you with many benefits for resales value. From increased appeal to buyers and a higher perceived value, to an advantage on the marketplace and easier negotiation, a well-maintained house will be a great foundation for an efficient sale. If you invest time and effort in routine maintenance and tackling the maintenance issues quickly, you will be able to maximize your property's value and draw buyers who recognize the value of a property that is well-maintained.
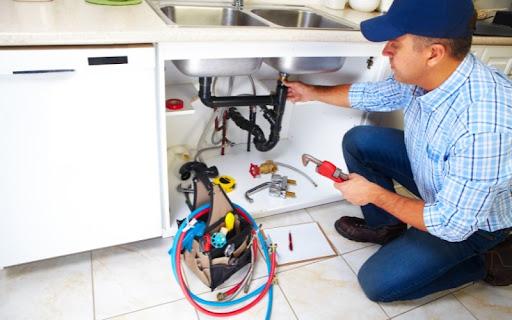
What Are the Common Plumbing Problems and How to Troubleshoot Them?
Plumbing problems can be the biggest nightmare for homeowners. From leaky faucets to blocked drains, these issues can cause disruption to your routine, and could cause harm to your house if unsolved. Knowing the most common plumbing issues and how to fix these issues can help you save time and money as well as anxiety. In this article, we'll look at several of the more frequently encountered plumbing problems and offer helpful tips on how to resolve them.
1. Dripping Faucets
A faucet that drips is not just a nuisance, it could cause the waste of a large amount of water over the course of time. The most frequent cause for the faucet to drip is a damaged or worn-out washer. To resolve this problem take these steps:
• Shut off your water supply: Find the shut-off valve beneath the sink, and turn it off to stop water flow.
• Remove the faucet from the wall by using a screwdriver. lift the handle, and expose the faucet's cartridge or the valve stem.
• Replace the washer. Remove the washer that was used then replace it with brand new one that is the same type and size. Reassemble the faucet and switch off the water supply to test for leaks.
2. Clogged Drains
Clogged drains are a typical plumbing issue that can happen in showers, sinks or in toilets. The accumulation of soap residue, hair and food particles or other particles can impede water flow and lead to backups. Here's how to fix the problem of a blocked drain:
• Make use of a plunger. Place a plunger in the drain to create an impervious seal. Pull and push the plunger hard to break up the blockage. Repeat the process several times if needed.
• Try a drain-snapper or auger: Put an auger or drain snake into the drain, and then rotate it until it breaks up the clog or eliminate it. Follow the instructions of the manufacturer to ensure proper use.
• Mix baking soda, vinegar and. Pour one teaspoon of baking soda, followed by one cup of vinegar down the drain. Cover the drain with a towel and allow the mixture to rest for around 30 minutes. Rinse by using warm water to remove the blockage.
3. Running Toilet
A toilet that is running can cause a lot of waste water and can result in expensive water costs. The issue is usually caused by a malfunctioning flapper valve or an ineffective fill valve. Here's how you can troubleshoot the issue with a toilet that is running:
• Examine the flapper valve: Lift the lid of the toilet tank and check the valve. Check that it's sealed properly. If it's damaged or worn you can replace it with new one.
• Make sure the valve is filled If you find that the valve isn't the problem, then look at the valve for fill. Set your water levels to the suggested level or replace the valve if it's damaged.
4. Low Water Pressure
The lack of water pressure is quite frustrating particularly when it affects many fixtures within your home. Many factors can contribute to the low water pressure, for instance the clogging of an aerator or shut-off valve, or the buildup of minerals within the pipes. To fix the issue of low water pressure:
• Clean the aerator: Take the aerator from the faucet, and scrub it clean. If it's blocked you can put it into vinegar and let it dissolve any mineral deposits.
• Examine the valve that shuts off: Check that the shut-off valve on the fixture is open. Sometimes, it could have been accidentally closed partially.
• Remove any mineral buildup you suspect the presence of mineral buildup within the pipes, it is possible to engage a professional plumber to cleanse up or repair the pipes that are affected.
5. Water Heater Issues
Issues caused by water heaters can cause an insufficient supply of hot water or insufficient heating. If you're having issues in or issues with your water heater, take a look at the following steps to troubleshoot:
• Make sure you check the pilot light If you own gas water heater, ensure that you have the pilot light is on. Follow the instructions provided by the manufacturer to replace it if required.
• Set the thermostat to your desired temperature: Make sure the temperature setting of the water heater is set to the right. Check the user's manual to get information on adjusting the temperature.
• Clean the tank In time, the deposits of dirt can accumulate in the water heater tank, which can affect the performance of the tank. The tank should be swept clean to eliminate any traces of sediment, in accordance with the instructions of the manufacturer.
It's important to keep in mind that although these troubleshooting suggestions will help you solve the most common plumbing issues however more complicated issues might need the assistance of a skilled plumber. If you're not sure or feel uncomfortable in any plumbing repair then it's recommended to get help from a professional to prevent any further harm.
In the end, knowing the common plumbing issues and how to fix these issues can save you money, time and a lot of frustration. Following the steps laid out in the article you will be able to solve leaking faucets, clogged drainage, flushing toilets low water pressure and water heater problems without fear. But, be sure to consider your safety and seek the advice of a professional plumber if you require. If you take care of your maintenance and make prompt repairs, you will be able to ensure that your plumbing system is in top condition and ensure the efficient running of your house's water supply.
How to Choose the Right Handyman for Your Home Improvement Projects
When it comes time to tackle house improvement tasks, getting the right handyman could be the key to success. When you need help in minor repairs, renovations or maintenance work A skilled and trustworthy handyman will help you save time and money as well as unnecessary stress. With so numerous options available it's important to know how to select the best handyman to meet your requirements. In this post, we'll give you valuable advice and advice to help make a smart choice and choose the right handyman for your home improvement project.
1. Define Your Project's Requirements Before you begin searching for a handyman, you must clearly identify your project's requirements. Take note of the type and the scope of the work you require assistance with. Do you need an individual to help with small repairs or paint a room or finish a major remodel? Knowing the requirements of your project will assist you in finding an expert handyman who has the abilities and experience.
2. Get Recommendations: Ask your neighbours, relatives, friends or coworkers for suggestions. The personal stories and knowledge can be valuable in locating the most reliable and experienced handyman. You can also turn to review and online platforms as well as websites to get more suggestions and read reviews from customers.
3. Examine the licenses and insurance: Make sure that the handyman you're looking at has the appropriate permits and is insured. The requirements for licensing may differ based on the area you live in and the kind of work to be done. A properly insured policy protects homeowners and handymen in the event that there are accidents or property damage caused during the construction.
4. Examine their experience and qualifications An experienced handyman must possess the necessary experience and know-how in the kind of work you need. Ask about their experience as well as their special abilities, qualifications and any education they've had. Request an example of projects similar to those they've completed in the recent past.
5. Request References: Do not hesitate to request references from past clients. Contact these people to ask about their experiences dealing with the Handyman. You can inquire about the standard of the work, professionalism, timeliness and overall satisfaction with the services offered. Positive references are an excellent indicator of a dependable and experienced handyman.
6. Assess professionalism and communication: Effective communication is essential when working with an experienced handyman. In the initial interaction be sure to evaluate their responsiveness, attention to detail and their willingness to answer your concerns and questions. Professional handymen should keep clear and open communication throughout the duration of the project.
7. Get Multiple Quotes Request quotes from several handymen so that you can compare prices and services. Be sure to ensure your quotes are clear and include the price of labor, materials as well as any additional fees. Beware of low or high-priced estimates, since they could be indicative of subpar work or hidden costs.
8. Discussion of Project Timelines: Discuss the anticipated timeline of the project along with the handyman. Find out if their schedule is in line with your deadline. A clear communication regarding dates and times will prevent any delay or confusion.
9. Examine Pricing Structures: Handymen may charge by the hour, by project, or the mixture of the two. Know your pricing model and be prepared to discuss possible adjustments or extra charges that might occur during the course of the course of the project. A written contract should be requested that defines the project's scope, pricing, payment terms as well as warranty information.
10. Don't be afraid of your instincts: Last but not least be sure to trust your gut when choosing the right handyman. If you have doubts or questions, it's better to keep searching until you locate someone who is able to meet your needs and makes you feel confident in their capabilities.
If you follow these guidelines to follow, you will be able to select the ideal handyman to tackle your home improvement projects with confidence. Be sure to put in the time and effort in choosing a trustworthy and experienced professional will lead to the smoothest and most successful project. A professional handyman with experience will not just complete the job to your complete satisfaction, but will also offer valuable information and guidance during the course of the project.
Top Tips for Skirting Board Installation: Enhancing Your Home's Appearance
Skirting boards, often referred to by the name of baseboards are an important aspect of interior design and can improve the overall look of your house. They don't just give an elegant appearance to the intersection between the floor and the walls but also provide protection from damages and can help hide unattractive gaps or uneven edges. If you're installing decking for the very first time or replacing your existing ones by following the correct techniques and guidelines will ensure an attractive and seamless outcome. In this article, we'll give you the best tips for installing skirting boards to make your home appear more attractive.
1. Measure and Plan Ahead Before you begin the process of installing it's essential to accurately measure the walls and design the arrangement of skirting boards. Find how long each of the walls are, and add a few inches to accommodate the possibility of cutting, or even mitering. Be aware of any angles or corners that require particular attention. A clear and precise plan will allow you to determine the number of skirting boards you will need and also ensure a safe installation.
2. Pick the Best Skirting Board The boards for skirting come in a variety of styles in terms of materials, sizes, and styles. Think about the overall look of your house and select skirting boards that match the style of your home. You can choose the classic, traditional style or a contemporary, minimalist design, pick skirting boards that match your vision of design. Also, choose high-end materials that are long-lasting and easy to clean, such as MDF (medium-density fiberboard) or solid wood.
3. Preparing the Skirting Boards Before installing it is crucial to prep your skirting boards. If they aren't finished or need painting, lightly sand them to smooth out any rough edges or flaws. If you are planning to apply paint on the skirting boards make sure to do it prior to installation for an easier and cleaner finish. Make sure you allow for adequate drying time prior to taking the boards down or putting them in place.
4. Start with a Straight Edge When installing skirting boards it is recommended to start with an even edge. Make use of a spirit-level or a straight edge trace a line of level across the wall, just higher than the floor level. The line will be used as a guideline to install your first skirting board. Making sure that the surface is straight and level starting point can help ensure an even alignment and consistency throughout the process of installation.
5. Use the correct tools The right tools is vital to an efficient skirting board installation. The tools you might require include a tape measuring device, miter saw or coping see and hammer, nail gun and spirit level and adhesive, screws or and caulk guns. Utilizing the right tools will facilitate the installation process and will allow for more precise cuts as well as secure attachments.
6. Cut and fit the Skirting Boards Cut and fit your skirting board is an essential process to achieve the best results. For internal corners, you can use the miter saw, or copingsaw in order to trim the skirting board at a 45 degree angle to ensure a smooth undisguised joint. For corners on the outside make the skirting boards at 45 degrees with the reverse direction. Be sure to make exact cuts and check the fit of each piece before affixing them to your wall. If needed, make small adjustments to ensure a secure and smooth fit.
7. Install the skirting Boards: Based on the type of material and individual preference, you may decide to fix the skirting boards by using screws or adhesive. If you're using adhesive, apply it in a uniform manner along the side of your skirting boards, then press it down firmly to the walls. Remove any excess adhesive right away. Alternately, you can utilize screws to fix to the boards for skirting. Make holes prior to drilling them in order to prevent splitting the boards, and ensure an ensconced connection. Make use of a countersink to create a recess the screw heads, which allows for an even finish.
8. Fill and sand the Gaps after installing the skirting boards there may be tiny gaps or joints that are uneven between the walls and the boards. Fill the gaps with the appropriate filler or caulk and make use of a putty blade or a caulk smoothing tool make a smooth surface. Let the filler dry completely before sanding lightly to create a seamless blend with the walls and skirting boards.
9. Paint or finish the Skirting Boards When the skirting boards are in place and gaps have been filled and sanded to paint them or finish the boards. Apply a primer to protect the surface and facilitate greater adhesion to paint. Select a paint shade that matches the overall scheme of color in the room. Apply it in a uniform manner using an airbrush or roller. Be patient to create an even and smooth look, paying particular attention to particulars like edges and corners.
10. Regular Maintenance In order to keep your boards' skirts looking good It is essential to carry out regular maintenance. Make sure to clean them often to prevent the accumulation of grime and dirt. When the boards have been coated, be sure to check them frequently for evidence of wear or chipping. Make any repairs necessary to maintain a neat and polished look.
Installing skirting boards will greatly improve the appearance of your home, while also providing practical advantages. Follow these best practices for installing skirting boards, you'll be on your way to creating an attractive and seamless outcome. Make sure you measure and plan ahead, select the best skirting board, make the boards correctly and make use of the right tools. Be patient when making and fitting the boards, then secure the boards with a strong hold, then finish off any gaps to create a flawless look. By paying attention to the details and a effort it is possible to improve the look of your home's interior by installing elegantly installed skirting boards.
For more details, visit
https://www.google.com/localservices/prolist?g2lbs=ADZRdkskJCtM57DFiO6d66aQG29ez8O_CdZpPcVabMHLeMoMeZG-XJgLNPlx7GFMAY-9Rc6XemjEeQ5PFtMGwVsenrj0MokHysPiHXvHjgKMkEhjXT3Zh-w21MxCDWpEjgp8ajVyiDBl&hl=en-GB&gl=uk&ssta=1&q=Handyman+luton&slp=MgA6HENoTUlvc3pnbG9uZ193SVZ3NU5tQWgzUE9RbDBSAggCYAB6kgJDZzVJWVc1a2VXMWhiaUJzZFhSdmJramlfSm1BbmEtQWdBaGFIQkFBR0FBWUFTSU9hR0Z1WkhsdFlXNGdiSFYwYjI0cUJBZ0RFQUI2QlV4MWRHOXVrZ0VJYUdGdVpIbHRZVzZhQVNORGFGcEVVMVZvVGsxSE9XNVRNRlpLVVRCR2JsTlZUakZPUjBacFpVZEdRa1ZCUmFvQldnb0pMMjB2TURreFh6bDRDZ2d2YlM4d1ptYzJheEFCS2d3aUNHaGhibVI1YldGdUtBQXlIeEFCSWh0U0JCWjZIUmFmbDdPSEQ4dzYtUnp3MWJHSERyLWdfTFFjS0g4eUVoQUNJZzVvWVc1a2VXMWhiaUJzZFhSdmJnkgG3AgoNL2cvMTFoNzgwZF9tMgoNL2cvMTFyX2s2cF8yNAoNL2cvMTFzc3J5ZHl4YgoNL2cvMTFkemR2bTRjXwoNL2cvMTFqNnZuODNjcwoNL2cvMTFwY25mdDBjdwoNL2cvMTFrNHRfd2MzcQoNL2cvMTFienN4YzliNAoNL2cvMTFoMjRyNmx6ZwoNL2cvMTFybjI5Yl94agoNL2cvMTF0ZHB3N3lxZwoNL2cvMTFxZzk3MG50awoML2cvMXE1Ym03NXpkCg0vZy8xMXJqbTV4ZDMwCg0vZy8xMXM1OG1scTN6Cg0vZy8xMW5mZjcwNWJ5Cg0vZy8xMWY0dF9wMzl0Cg0vZy8xMXB6eXhuZnFzCg0vZy8xMWdnZmhzOXI4Cg0vZy8xMXQxcjE3OGoyEgQSAggBEgQKAggB&src=2&spp=Cg0vZy8xMXJfazZwXzI0OoQCV2hJUUFDSU9hR0Z1WkhsdFlXNGdiSFYwYjI2YUFTUkRhR1JFVTFWb1RrMUhPVzVUTUZaS1VUQkdibE5WVVhSbGEzUXhWa2R3TTFKU1FVS3FBVm9LQ1M5dEx6QTVNVjg1ZUFvSUwyMHZNR1puTm1zUUFTb01JZ2hvWVc1a2VXMWhiaWdBTWg4UUFTSWJVZ1FXZWgwV241ZXpod19NT3ZrYzhOV3hodzZfb1B5MEhDaF9NaElRQWlJT2FHRnVaSGx0WVc0Z2JIVjBiMjdDQVNnSWZpSWtRMmhrUkZOVmFFNU5Semx1VXpCV1NsRXdSbTVUVlZGMFpXdDBNVlpIY0ROU1VrRkM%3D&serdesk=1&lrlstt=1687752813240&scp=Cg1nY2lkOmhhbmR5bWFuEjMSEglJLPYYADZ2SBGB1u_tA1P6MyIFTHV0b24qFA1dXegeFWPMsv8dTIvzHiUim8r_MAAaCEhhbmR5bWFuIg5IYW5keW1hbiBsdXRvbiofSGFuZHltYW4vSGFuZHl3b21hbi9IYW5keXBlcnNvbg%3D%3D
When to Schedule Roofing Repairs: Maintaining the Integrity of Your Home
Introduction:
Your roof is among the most important elements of your home's construction protecting it from the elements while providing safety and security that your household. But, with time roofing systems can become damaged because of age, weather conditions, and other elements. Understanding when to plan roofing repairs is crucial to maintain the strength of your house and avoid expensive damage. In this article, we'll examine the indicators that suggest it's time for roof repairs, and offer suggestions on how you can keep your roof in good state.
1. Age of the Roof:
The condition of the roofing is an essential aspect in deciding when it is time to plan repairs. Different roofing materials come with different durations of life, so it is important to determine the date when your roof was first installed. For instance asphalt shingle roofs generally last between 20 and 25 years, whereas metal roofs can last considerably longer. In the event that your roof appears to be at the limit of its longevity or has already exceeded it, you should conduct a professional inspection, and look into fixes or replacement.
2. Missing or Damaged Shingles:
Check your roof frequently to check for damaged or missing shingles. Storms, high winds, as well as extreme weather could cause shingles to fall and crack, curl or even fall off completely. Damaged or missing shingles expose your roof to damage from leaks or water damage. If you observe a significant number of damaged or missing shingles, you must plan repairs immediately to avoid any further damage and internal damage.
3. Leaks and Water Damage:
Leaks in the water are a sure signal that your roof needs immediate attention. Examine your attic or ceiling for any indications of water staining, discoloration or dampness. These signs indicate that water is getting into your roof and repair is required to stop further damage from occurring. It's essential to deal with leaks immediately, since long-term water exposure could lead to growth of mold, weakening structural integrity and cost-effective repairs.
4. Sagging or Uneven Roof:
A roof that is uneven or sagging is a serious problem that requires immediate attention from a professional. It can indicate structural problems or weak support systems. If you observe any signs of apparent sagging or a roofline which appears uneven, you need to have an inspection scheduled immediately. If you don't take care of this, it could result in more serious structural damage, and may affect the security of your house.
5. Granule Loss and Shingle Deterioration:
Examine your roof for indications of granule loss in asphalt shingles. As time passes wear and tear may cause the protective granules of the shingles to break down. A large loss of granules could cause deterioration of shingles and make them less effective in safeguarding your roofing. If you observe a large quantity of granules in your gutters or signs of shingle damage, you should to plan repairs in order to avoid further damage and extend the lifespan the roof.
6. Roof Flashing Issues:
Flashing is a vital element of your roof, creating a waterproof protection around chimneys, vents, skylights and other areas where the roof is in contact with vertical surfaces. If you observe damaged or degraded flashing, it's crucial to plan repairs. Flashing that is damaged can lead to water getting in and even leaks. A skilled roofer will inspect and fix or replace the flashing when needed to preserve the structural integrity and integrity of the roofing.
7. Energy Efficiency Concerns:
The roof of your home plays a crucial part in the energy efficiency of your house. If you see an increase in your energy costs or you experience fluctuations in temperatures within the house, this could be a sign of problems on your roof. A lack of insulation or roofing materials that are damaged could cause heat loss or gain, causing the HVAC unit to perform more efficiently. Planning roofing repairs that improve insulation and fix any issues with ventilation can improve efficiency of your energy and decrease cost of energy.
8. Visible Signs of Wear and Tear:
Check your roof regularly for obvious evidence of wear and wear and. This could include blistered or cracked shingles, broken or loose roof tiles, degraded sealant, moss or algae development. Although some problems may appear to be minor, they may become worse in time if not addressed. The timing of repairs at the first indications of wear will stop further damage from occurring and prolong the life of your roofing.
Conclusion:
Being aware of when to schedule roofing repairs is essential for keeping the quality of your home and safeguarding your investment. Be on the lookout for indications such as damaged or missing shingles, leaks or rooflines that are uneven or sagging or granule losses, problems with flashing and energy efficiency issues and obvious wear and wear and tear. If you see any of these indicators it is important to arrange for a professional inspection and take action immediately. A regular maintenance schedule, prompt repairs and a professional roof inspection will keep your roof in top condition, ensuring the security you need for your home, as well as security for your family.
Enhancing Your Home with Skirting Board Installation
Introduction:
Skirting boards, often referred to as baseboards are an attractive and practical feature for any house. These architectural pieces do more than enhance the visual appeal of a space they also offer protection to walls, hide wires and edges that are uneven, and provide a final touch on the design of your interior. In this article, we'll examine the advantages and drawbacks of installing skirting boards and help you understand the reasons why they're a great feature to have in your home.
1. Aesthetic Appeal and Finishing Touch:
Skirting boards can be a versatile design feature that can improve the aesthetic of any space. They provide a sense of completeness to the overall design by creating a visual line between the floors and walls. Skirting boards come in different designs, sizes and designs that allow you to pick the one that matches the design of your interior. From traditional and traditional styles to contemporary and modern designs, skirting boards give you many options to enhance the aesthetic appeal for your residence.
2. Protection for Walls and Concealment of Wiring:
Skirting boards serve an important function by protecting walls. They function as a protective barrier to protect the lower section of walls from damage, like scratches, scuffs, and knocks caused by furniture, vacuum cleaners or even foot movement. Skirting boards are also an effective way of hiding ugly cables, wiring and pipes that are snagged across the bottom of walls. By efficiently hiding these things they contribute to the appearance of a neater and organized living space.
3. Covering Gaps and Uneven Edges:
When you are in the construction or remodeling process, walls could be uneven or have gaps at the point where they join the flooring. Skirting boards are an efficient solution for covering these flaws. The boards are meticulously measured and installed to provide an even transition between the flooring and the walls covering any cracks or imperfections. This care for detail results in a an elegant and professional appearance inside your home.
4. Easy Maintenance and Cleaning:
Skirting boards are fairly easy to clean and maintain. They help keep dust, dirt and debris from building up in the gaps between floors and walls which makes it easy to maintain your home tidy and clean. A regular dusting or wiping down with a damp cloth is typically enough to keep the appearance that skirting boards provide. They can also be painted or refinished if you wish to update the appearance of your home without having to undertake an extensive remodeling.
5. Enhanced Soundproofing and Insulation:
Skirting boards can aid in an improvement in the soundproofing and insulation of your home. They provide a barrier to reduce the transfer of sound from rooms and from external sources. This can be especially helpful for those who reside in an area with a lot of noise or have rooms that are devoted to activities that require silence like an house office and a baby's room. Skirting boards are also a great way to reduce drafts, and ensuring a more steady indoor temperature, eventually aiding in energy efficiency.
6. Considerations for Skirting Board Installation:
If you are considering installing skirting boards there are some things to consider. The first is to select the best material that will meet your requirements for example, wooden boards, MDF (medium-density fiberboard) as well as PVC (polyvinyl chloride). Each offers its own benefits in terms of longevity price, cost, as well as aesthetics. The second thing to consider is the width and height of your skirting board. While skirting boards that are taller can provide a sense of grandeur and class to a space but they are not appropriate for rooms that have low ceilings or restricted wall space. It's crucial to find the right balance between practicality and aesthetic appeal. Also, talk to an expert or conduct extensive study to make sure you are using the right installation methods and determine whether any additional tasks, such as taking down the old skirting boards, or fixing walls that are uneven, is needed.
Conclusion:
The installation of a skirting board is an excellent feature to add to your home. It offers both practical and aesthetic advantages. They can enhance the overall look of rooms, guard walls, hide wiring and add a refined finish to your interior design. Skirting boards allow for ease of maintenance, help with insulation and soundproofing as well as covering the gaps and uneven edges. When you carefully consider the material selections size, dimensions, as well as professional installation, you will be able to transform your home and reap the many advantages skirting boards provide.
How to Install Skirting Boards for a Polished Look
Skirting boards, sometimes referred to by the name of baseboards are an important element of interior design that offers a polished and slick design to any room. They not only cover the joints between the floor and the wall and the floor, they also shield the wall from harm and provide architectural appeal to the room. If you're trying to improve the appearance of your home by putting up skirting boards, this step-by-step guide will assist you to create a polished and professional end.
1. Take measurements and plan: Begin by taking measurements of the length of each wall you are planning to place skirting boards. Make precise measurements and think about any obstacles or corners that might require additional cutting or adjustments. Once you've got the measurements, you can calculate your total skirting board you'll need, taking into consideration excess length and waste for joints and corners.
2. Pick the best skirting board There are many kinds of skirting boards to choose from with different dimensions, styles and materials. Pick a skirting board model that matches the overall design of your room. Think about the design style of your house and the ceiling's height as well as the molding or trim within the space. Choose an option that is compatible with your budget and preferences like hardwood, MDF (medium-density fiberboard) or PVC.
3. Preparing the Skirting Boards Prior to installation, you'll need make your skirting boards. Cut the boards into the proper lengths with a miter saw or handsaw with the miter box. Make sure that you cut the boards at 45 degrees to create clean and smooth corner joints. If you have internal or external corners, you can use the coping saw to cut perfect and snug-fitting joints.
4. Prepare the Floors and Walls Make sure that the floors and walls are free of any debris or protrusions that could affect the installation. Remove any existing baseboards and trim them with care, if required. If the floor and walls are uneven, you can use an sander or a plane to make an even surface for skirting boards to stick to.
5. Apply adhesive or use nails: Determine if you would prefer to use nails or adhesive to fix to the boards for skirting. Adhesive offers a sleek and seamless look, whereas nails add security and durability. If you opt to apply adhesive, simply apply a thin layer of construction adhesive on your skirting boards back, and push it down to the wall. If you prefer using nails, make holes prior to drilling the board to stop it from splitting and secure your boards against the walls with finishing nails.
6. Create Corner Joints To create the corners that are both external and internal be sure to make seamless joint. When you're working with mitered corners place the skirting board and make sure that the angles match perfectly. Apply glue or nails to fix the joints. If you're coping corners, make use of a coping saw to cut the skirting board's profile of your skirting boards, then removing the excess material and creating an extremely tight fitting joint.
7. Fill gaps and nail holes When the skirting boards are in place make sure you fill any gaps or nail holes with caulk or wood filler. Smooth out the filler using an apex knife and let for it to cure. Sand the areas of filler lightly to make a smooth and uniform surface.
8. Sand and finish If you wish sand the skirting boards lightly to smooth out the rough edges and flaws. Utilize a fine-grit sandpaper, and sand along with the grain of the wood. After sanding, remove any dust using the use of a dry cloth. Apply the primer coat to the skirting boards in order to make them suitable to be painted or stained. After that, apply your choice of stain or paint by applying even coats to achieve an elegant and polished appearance.
9. Clean up: Once the stain or paint is dry, remove any excess material or debris that were left behind during the process of installation. Get rid of any tape used by the painter or protective covers and make sure that the space is tidy and clean.
If you follow these steps, you'll be able to put up skirting boards in a precise manner and create a polished appearance in your living space. Be sure to take your measurements carefully, select the appropriate skirting board style and materials be sure to pay attention to the corner joints and the finishing specifics. With a bit of perseverance and attention to detail Your skirting board installation can transform the appearance as well as feel of the living space and add a touch of class and elegance.